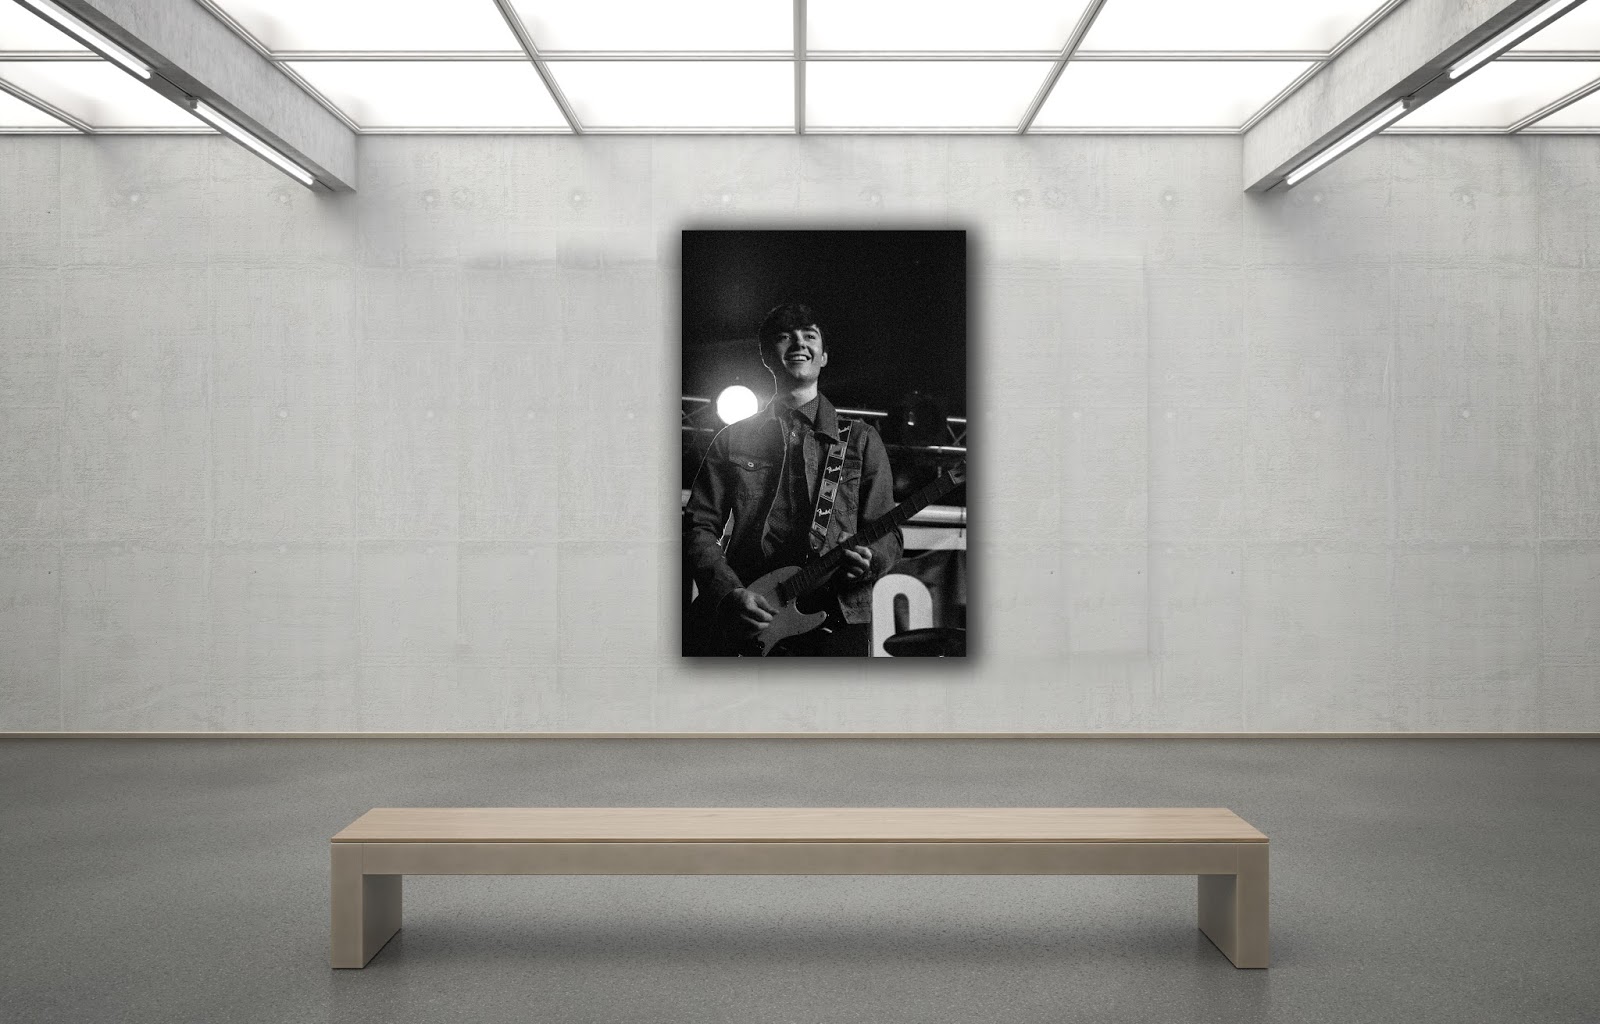
Photo 1
This is a photo of the lead singer. Through editing I tried to enhance the light behind him to help bring out the colours. Blue and orange colours are complimentary colours which help make the final photo look more aesthetically pleasing. When editing this photo I tried to create a sense of mystery by enhancing the light behind the singers face. This light covers some of the guitarists face which can help hide his emotion.
Editing Process
Here I begin editing the photo in Adobe Lightroom. I begin by bringing the exposure down and the contrast up. Then as the light in the background is highly bright, I bring the highlights all the way down. Followed by moving the shadows up by +9, the whites +5 and then the blacks down by -34. To create more definition between the light and my subject I turn the clarity up by 55.
In this part of editing I change the tone map. I begin by moving the lights up by 25 followed by bringing the darks down by 8 and the shadows down by 46. This helps define the subject from the light behind him.
Here I adjust the amount or sharpening on the image. I increase the sharpening marginally to avoid too much grain.Then i increase the luminance to reduce the amount of noise.
All I did in this part was to bring the dehaze function down to reduce the light pollution in the image and increase the contrast in the image.
For this part I moved to photoshop to outline the subject. I did this then inversed my selection and applied a gaussian blur to the background. This helped create a shallower depth of field to the image to bring out my subject more.
Here I applied a gradient overlay to help bring the colours out more.
Photo 2
When editing this photo I tried to bring out the drummer. Before this he was highly washed out and hard to see. By bringing up the exposure, it helped bring out his face. His face can connote that he is looking into the crowd analysing everyone, and his fans. Additionally I tried to amplify the his drumming to reenforce verisimilitude of creating music.
Editing Process
In this section I balanced the underexposed image by initially bringing the exposure up and the contrast down. This allowed me to see the image more clearly. I then brought the overexposed images' highlights, shadows and blacks down to balance out the image. Additioanlly I brought the clarity up to help make objects stand out.
As I had to bring the exposure up, it added a lot of unwanted noise. Therefore I reduced this by increasing the luminance on the image.
I then took this image into photoshop to further reduce the noise and grain on the image.
Photo 3
In this photo I turned it into a sepia tone. This helps create a warm feeling without taking all the colour out of the photo. I tried to match the expression of the bassist, that being warm. The black and white can help isolate the assists and capture him in his own little world.
Editing Process
I begin editing this photo by bringing the exposure up slightly as the image was rather dark. I then bring the contrast down to make the image clearer. I then turned the whites on the image up as this was the stand out colour on the bassist. To create the black and white I turned both the vibrance and saturation all the way down.
To create the grain in this image I first added a large amount of sharpening to bring out any existing noise.
I then use the grain effect in Lightroom to further the amount of grain.
Photo 4
In this photo I tried to replicate photos taken on film original film cameras. Many photos of great bands were taken on film which create the high grain, monochrome images. I did this by making the photo black and white/monochrome and added a large amount of grain. Unlike my first image when I enhanced the light behind the guitarist, I purposely dulled it down. This is as I wanted the audience to see the smiling expression on the guitarists face. Mainly because he is smiling and looking as though he is enjoying himself.
Editing Process
This image was also underexposed, so I had to bring the exposure up and match this with the contrast by bringing this down. I brought the highlights up but the white and blacks down to get this image.
To add the grain on this image I replicated how I did it for my previous image. this was by firstly adding a large amount of sharpening to my image.
I then bumped up the grain effect to further the grain in the image. Additionally I used the de-haze feature to bring down the haze layer that covered the image.
Photo 5
For this photograph I purposely, in editing, created a shallow depth of field. I did this as it helped isolate the guitarists from the rest of the room. This helped convey the meaning of being in the moment and how the guitarist is expressing himself through it.
Editing Process
For this image it was fairly over exposed, therefore I had to bring the exposure down and match that by bringing the contrast up. I then bring the Highlights and blacks down to create less of a haze on the image. Followed by bumping up the shadows and whites to make a balanced image. Moreover I turned up the clarity so that the guitarist would stand out from the background.
I wanted to focus on the guitarist so I tried to add a larger depth of field to the image. I did this by firstly outlining the guitarist with the pen tool in Photoshop.
I then made this the selection and inverted it to select the background.
Followed by adding a gaussian blur to create a shallower depth of field and make the guitarist stand out from the background.
Photo 6
When editing this photo I tried to focus on the drummers facial expression as this shows his passion and how focused he is on his drumming. The photo was originally underexposed therefore I had to change the colour and de-haze the image.
Editing Process
This image was very trick to balance as it was overexposed in a monochrome green. I had to change the tint of the image to get rid of the monotone and bring the exposure down and the contrast up slightly. I then brought the highlights down to help reduce the exposure. Followed by turning up the shadows, whites and blacks to create the balanced image.
The image above shows the tone curve map for how I changed the highlights, midtones and shadows.
This image was also fairly soft, so I then brought up the sharpening to make it more defined followed by reducing the noise created by this with the luminance tool.
As this image was highly overexposed I used the dehaze tool to get rid of the layer of haze on the image once balanced.
Photo 7
I made the image seem more still and stuck in time by creating a monochrome effect on this image. Additionally this black and white theme links to him being stuck in the moment with music, showing that his identity is being portrayed through music.
Editing Process
This image was a good image when taken so not a lot of editing was needed. I brought the exposure down slightly and increased the contrast as I made it into a black and white image. Additionally to make it black and white I turned both the vibrance and saturation down. Moreover I turned the clarity up to make the darks more defined.
I added a slight amount of noise reduction to this but not a large amount.
I also used the dehaze tool to help make the image more defined.
Photo 8
Within this image I turned down the the shadows and blacks to help make the guitarist stand out. Additioanlly I turned the clarity all the way up to help bring him out from the background. This can help connote isolation and make it seem as though he is fully focused on expressing his identity through the music.
Editing Process
I liked the colours on this image so I decided not to touch them. Therefore I wanted to make the photo more defined. I decreased the contrast however I turned up the clarity to counter this. Additioanlly I brought the shadows down as it was too dark on his jacket. I then brought the whites up to highlight his guitar.
Photo 9
When editing this photo I tried to balance the images' highlights and shadows while emphasising the stage light. This is as the stage light helps create a sense of being at the gig and reinforces verisimilitude.
Editing Process
For this image I wanted to create a balanced image. Therefore I brought the exposure quite far down but countered this by bringing the contrast and clarity up, which helped bring them out from the background. Additioanlly I wanted to emphasise the stage light behind them, so I brought the highlights and whites up.
Photo 10
In this image I had to edit a fair bit as it was highly overexposed when I took it. However I kept this image in colour so that the stage lights could divide the audience and the band. This is as I wanted to emphasise the two sets of identities although there both linked to music.
Editing Process
This photo was tricky to do, however I used the dehaze tool first so that I had a clearer idea of what to do to the image. I brought up the exposure and the contras down. I then brought up both the shadows and whites followed by bringing the highlights and blacks down.
There was also a large amount of noise on this image so I used the luminance tool to reduce this.
Here I use the dehaze tool and turn it up very high.